
Why Club Cleaning Matters – The Data
A clean golf club performs better than a dirty one. That’s not an opinion – it’s physics. Packed debris in grooves reduces backspin. Dirty soles misrepresent loft and lie angles during measurement. Hardened grips raise the risk of compensatory grip pressure changes that affect shot shape.
For a pro shop or fitting studio, club cleaning is more than maintenance. It’s the first step in any service workflow – and a missed opportunity when skipped.
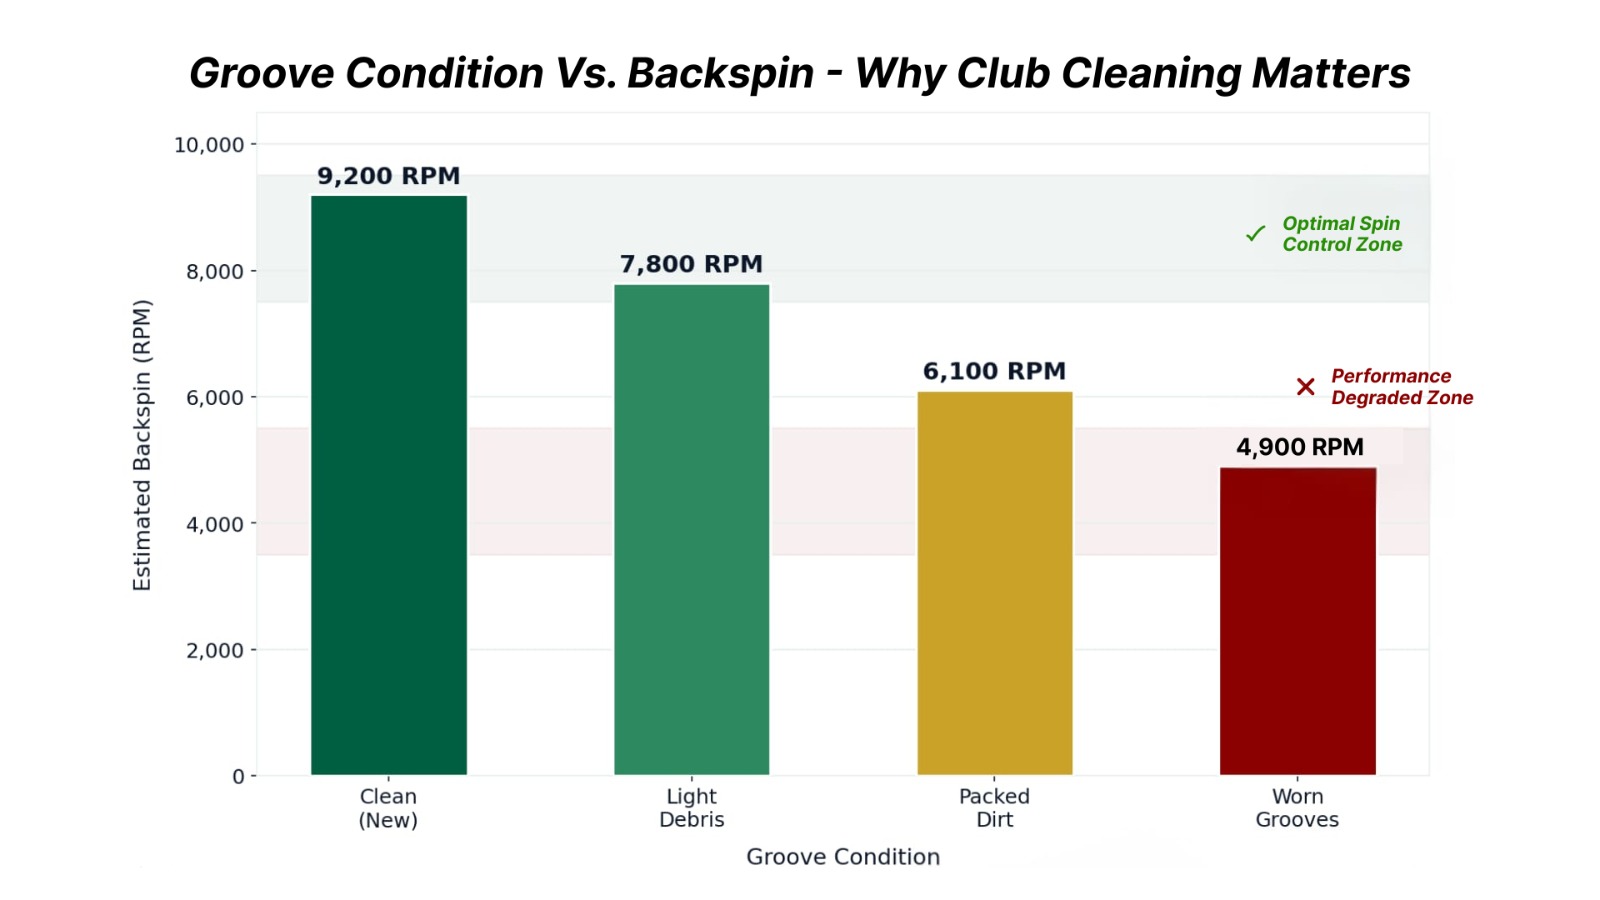
Figure 1: Backspin RPM by groove condition. Clean grooves (~9,200 RPM) vs worn or dirty grooves (~4,900 RPM) – a measurable performance gap visible on every green.
For pro shops, there’s a second reason equally important: dirty clubs produce inaccurate loft and lie readings. Even a thin layer of dried mud on the sole lifts a clubhead off the measurement platform, skewing the reading by 0.5°-2°. Every fitting session and loft/lie adjustment job should start with a clean club.
THE PRO SHOP STANDARD Every club that comes in for service regripping, reshafting, loft/lie adjustment, or full fitting — gets cleaned before any measurement or repair work begins. Clean clubs reveal true specs. Dirty clubs hide problems.
What You Need
- Bucket of warm water with a small amount of mild dish soap
- Firm-bristle groove brush or hosel brush for groove scrubbing
- Soft-bristle brush for graphite and coated heads
- Clean microfiber towels (separate sets for heads and grips)
- Damp cloth for shaft wiping
- Mild soap solution in a spray bottle for grips
- Rust-treatment solution for steel heads with surface rust
For groove scrubbing, Mitchell Golf’s Wood Hosel Brushes (from $11.99) are available in
multiple diameters the wire bristle construction reaches the bottom of each groove channel. For holding clubs securely during cleaning, the Aluminum Vise Clamp ($135.99) with Pro Tour Rubber Vise Pads ($111.99) keeps both hands free for brush work.
The 8-Step Pro Shop Cleaning Workflow
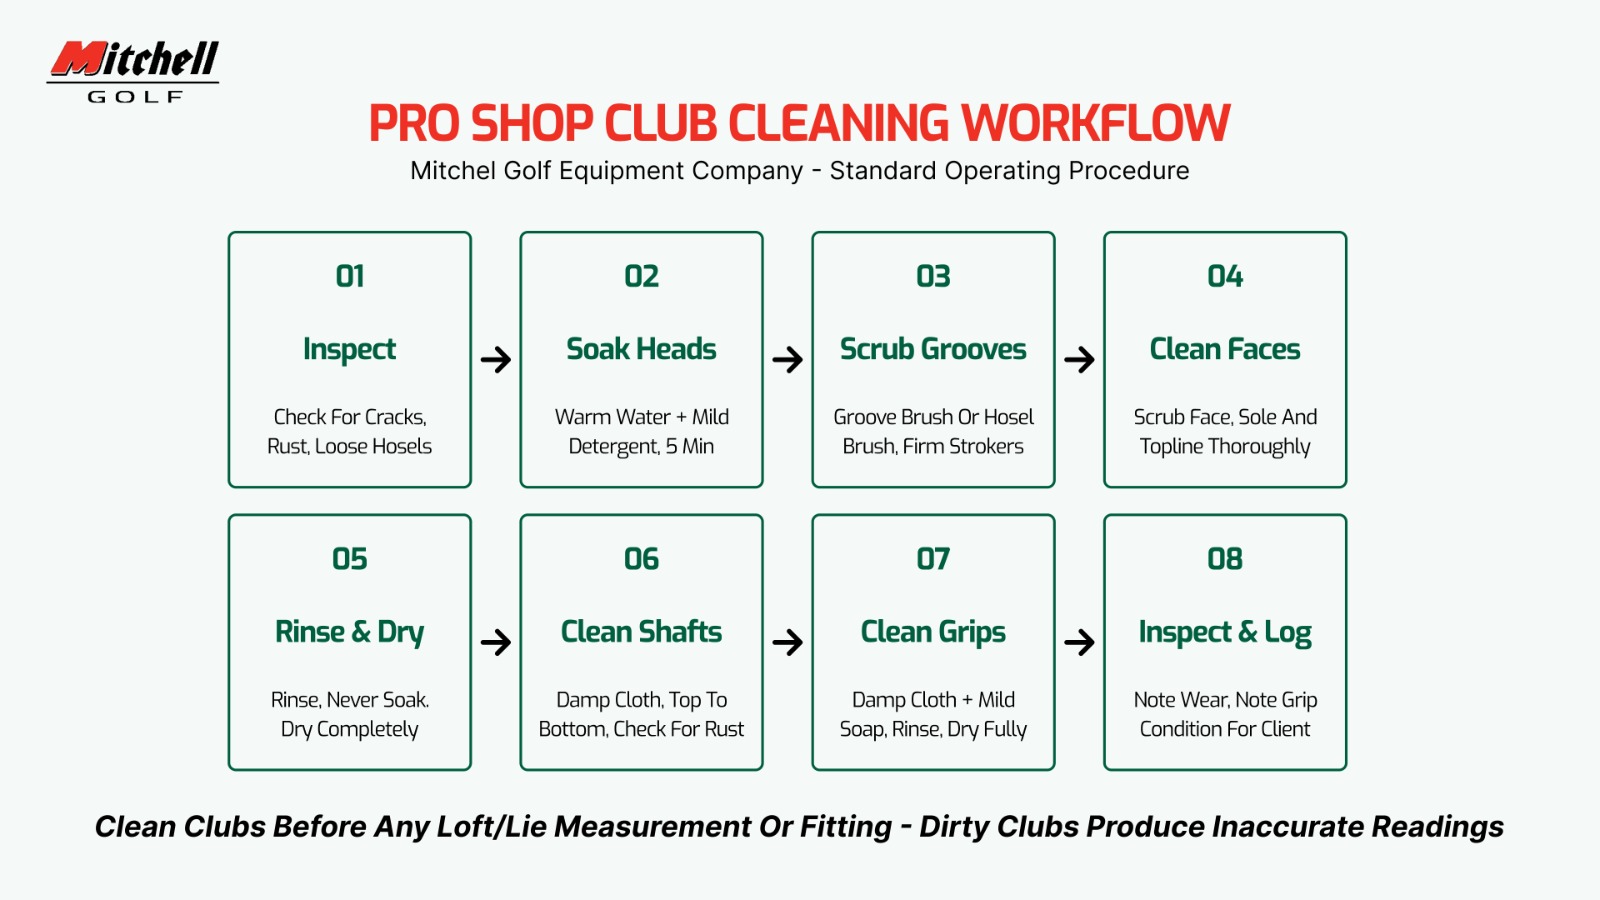
Figure 2: The Mitchell Golf pro shop cleaning workflow. Clean clubs before any fitting, measurement, or repair service. Dirty clubs misrepresent specs.
| 01 | Inspect First (2 min) | |
Before any water touches a club, inspect visually. Check for cracks in graphite shafts, rust at the hosel junction on steel shafts, loose ferrules, and face damage. Log any issues.
|
||
| 02 | Soak Iron and Wedge Heads (5 min) | |
Submerge iron and wedge heads in warm soapy water for 5 minutes. This loosens compacted grass, sand, and dried debris from grooves without requiring aggressive scrubbing.
|
||
| 03 | Scrub the Grooves (3–5 min) | |
This is the highest-impact step. Work each groove individually, heel to toe, with the brush perpendicular to the groove direction. Use short, firm strokes.
|
||
| 04 | Clean the Full Head (2–3 min) | |
With grooves clean, scrub the full club face, sole, and topline. Get into the hosel area where turf and debris pack around the ferrule base.
|
||
| 05 | Rinse and Dry Immediately (1–2 min) | |
Rinse each head under clean running water. Then dry completely face, back, sole, and hosel area with a clean towel. Don’t let clubs sit wet.
|
||
| 06 | Clean the Shafts (2 min) | |
Wipe each shaft from grip to head with a clean damp cloth. Check for rust on steel shafts especially in the first 6 inches above the hosel.
|
||
| 07 | Clean the Grips (2–3 min) | |
Wipe each grip with a cloth dampened with mild soapy water. Work in sections around the grip’s circumference. Rinse with a clean damp cloth. Dry completely.
|
||
| 08 | Inspect, Note, and Return (2 min) | |
After cleaning, do a final visual inspection of the full set. Note any wear, damage, or condition issues in the client record. This step converts cleaning into a value-added service.
|
||
Cleaning Club Heads by Type
Irons and Wedges
Irons tolerate the most aggressive cleaning steel construction handles firm brushing, soaking, and rinsing without issue. Forged irons with raw or oil-quenched finishes should be wiped rather than soaked to preserve the patina. Never use wire brushes on chrome-plated faces; they micro-scratch the plating and accelerate wear.
Woods and Hybrids
Modern driver and fairway wood heads are composite construction with adjustable weights and face inserts. Wipe clean with a damp cloth never soak. Use a soft brush on the face and crown. Pay attention to the hosel area around adjustable adapters, which collect debris that interferes with smooth adjustment.
Putters
Putter faces are often milled aluminum or insert-faced both are sensitive to abrasive cleaning. Use a soft cloth and mild soap only. For high-milled faces, compressed air clears debris from the milling without contact. Avoid any abrasive cleaner that could alter the face texture, which directly affects roll characteristics.
Grooves – The Most Critical Component
Groove condition is the single biggest controllable factor affecting backspin. Under USGA rules, groove width, depth, and spacing are precisely regulated. Dirty grooves can’t be measured accurately. And once grooves wear past the legal limit, no amount of cleaning restores their function; the club needs replacement or face milling.
FOR PRO SHOPS: CLEAN BEFORE YOU MEASURE Any loft and lie adjustment job should begin with a clean sole. Debris on the sole lifts the club off the angle machine’s measurement platform; even 0.5mm of debris can skew the reading by 1°. Clean clubs, then measure.
Wedge grooves pack the tightest because wedge shots are typically from tight lies, sand, and rough all abrasive environments that fill grooves quickly. A wedge that plays four rounds a week needs groove cleaning after every round to maintain full
Cleaning Shafts – Steel vs. Graphite
| Factor | Steel Shafts | Graphite Shafts |
| Cleaning method | Damp cloth, firm wipe | Damp cloth, gentle wipe only |
| Rust risk | Yes especially at hosel junction | No rust, but moisture traps under finish |
| Abrasive cleaners | Avoid on chrome; OK on raw | Never damages fiber resin |
| Surface inspection | Check for rust spots and pitting | Check for finish chips, cracks, delamination |
| When to reshaft | Structural rust, deep pitting | Visible cracks, delamination, soft spots |
The most common shaft cleaning mistake is using abrasive materials on graphite. Graphite fibers sit just below a thin resin surface coat. Any scratch opens the resin to moisture penetration which eventually causes fiber separation from the inside out.
Cleaning Grips Correctly
Grip cleaning is the most skipped step and the one that most directly affects a golfer’s connection to the club. A grip that looks clean can still be hardened from oil, sweat, and sunscreen buildup. The press test firm thumb pressure into the grip is the only way to assess compound condition accurately.
- Rubber grips: mild soap and water on a damp cloth. Work in sections. Rinse. Dry. Assess hardness.
- Cord grips: use a medium-bristle brush to clear the cord texture. Debris packs into the mesh and can’t be removed with wiping alone.
- Wrap grips: gentle wipe only, following the wrap direction to avoid lifting edges.
- Putter grips: wipe with a damp cloth. Most putter grips use softer compounds that are more sensitive to solvents.
After cleaning, if any grip fails the press test no give, uniform hardness it’s a regrip conversation. Mitchell Golf’s full re-gripping product category covers grip stations, solvent, tape, and vises for professional installation.
Cleaning Frequency Guide
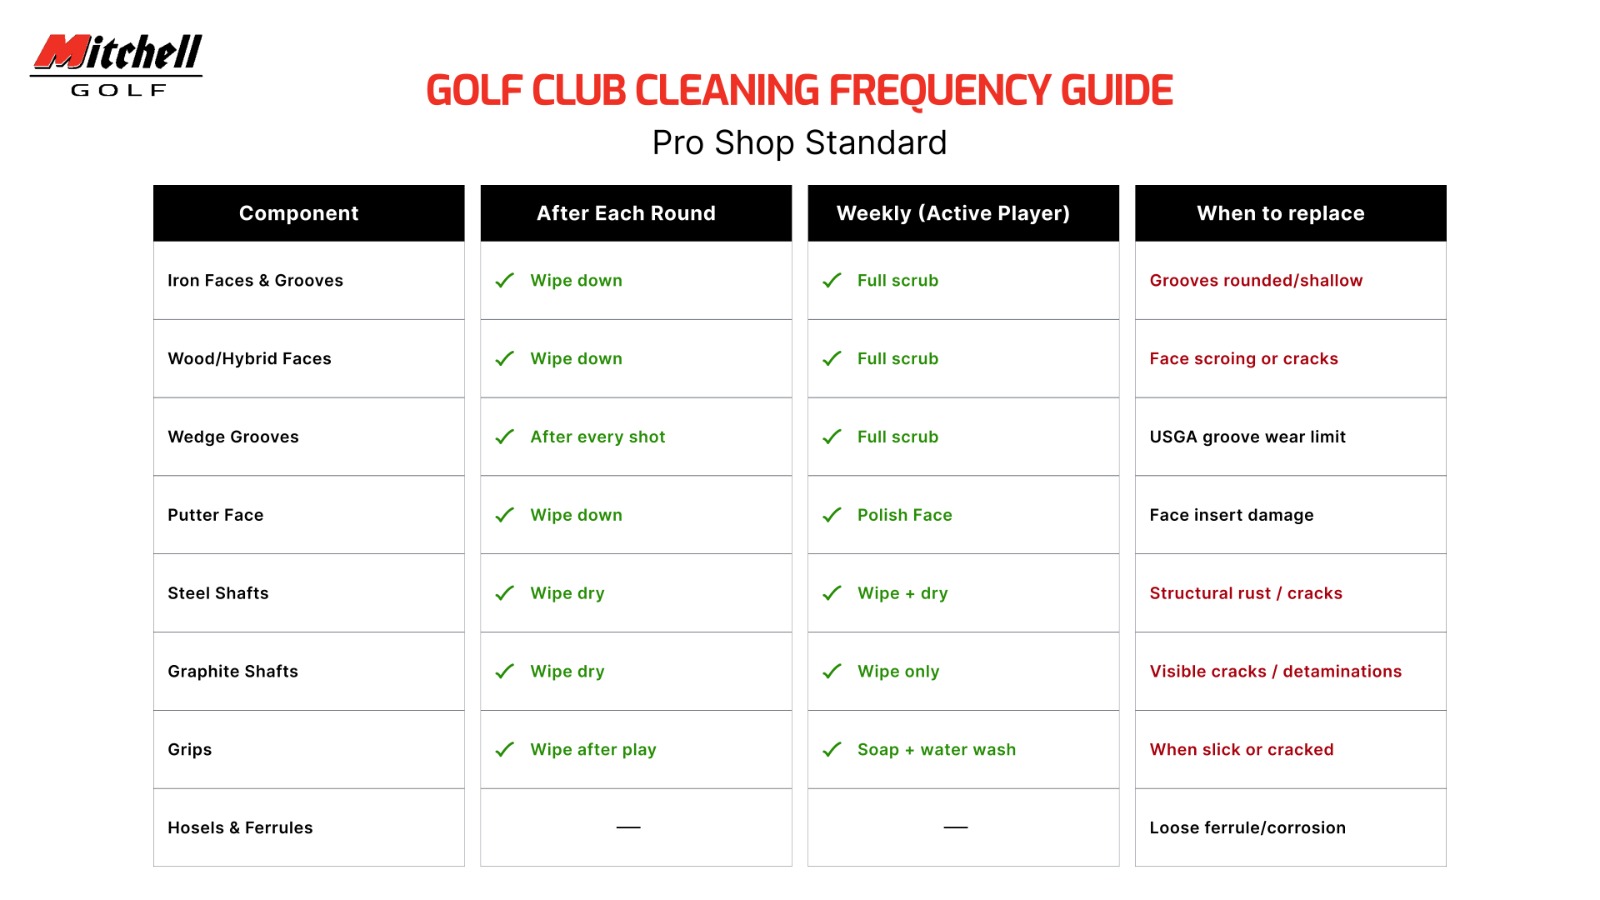
Figure 3: Pro shop cleaning frequency guide by component. Grooves and faces need attention after every round. Full deep cleans monthly or at every service visit.
| Component | After Each Round | Weekly (Active Player) | Monthly | When to Replace |
| Iron & Wedge Grooves | Wipe clean | Full soak + scrub | Deep clean + inspect | Grooves rounded/shallow |
| Wood / Hybrid Faces | Wipe clean | Soft scrub + wipe | Polish face | Face scoring or cracks |
| Wedge Grooves (tour) | After every shot | Full scrub | USGA wear check | USGA groove limit |
| Steel Shafts | Wipe dry | Wipe + rust check | Full inspection | Structural rust / cracks |
| Graphite Shafts | Wipe dry | Gentle wipe | Finish crack check | Delamination / cracks |
| Grips | Wipe after play | Soap + water wash | Hardness check | Slick or cracked |
What Not to Do – The Common Errors
Wire Brushes on Coated or Plated Faces
Wire bristles scratch plating, remove chrome, and create micro-pitting that traps more debris. Use nylon or natural-bristle brushes on any finished face.
Soaking Driver or Fairway Wood Heads
Modern wood heads have adjustable weights, internal channels, and face insert perimeter gaps that trap water. Moisture trapped inside a titanium driver head corrodes fasteners and internal weighting systems.
Abrasives on Graphite Shafts
Any abrasive including scotch-brite, fine sandpaper, or stiff brushes — damages the resin surface. Moisture penetrates through scratches. The shaft eventually soft-spots or delaminates from the inside.
Leaving Clubs Wet
Steel oxidizes within hours in humid conditions. Drying is not optional — it’s part of the cleaning process.
Strong Solvents Near Grips
Acetone, mineral spirits, and strong degreasers rapidly degrade rubber compounds. Grip solvents formulated for club repair are the correct choice for any grip-related cleaning or removal work.
Measuring Loft and Lie on Dirty Clubs
Debris on the sole creates an artificial angle between the club and the machine platform. Always clean the sole before placing any club in an angle machine for measurement or adjustment.