

The three main components of a golf club are the club head, the shaft, and the grip. And while every club has these three main parts, a club’s performance depends on optimizing each of these components to a golfer’s swing.
And there is a lot to take into consideration! As the golfer swings, the clubhead tries to square and sole itself. This ideally results in a perfect impact position to launch the golf ball. But of course, this perfect scenario seldom happens. That is why golf is a game of a degree of misses and not of perfect shots.
And also why the position of the club’s face attitude is one of the most critical factors in determining the ball flight direction and curvature. The lie angle of the club positions the club’s face attitude horizontally or tilted (up or down). Because lie angles are so critical to ball flight, it’s vital that irons are adjusted to fit each golfer’s characteristics.
Use these five steps (just like the pros) to optimize your golf club’s performance:
1. Register the Club Head
The first step to bending irons is registering the clubhead in a horizontal face attitude position. This is easily done by positioning the score lines parallel to the radius surface between the two Vertical Face Fixture bars used to square the club’s face. 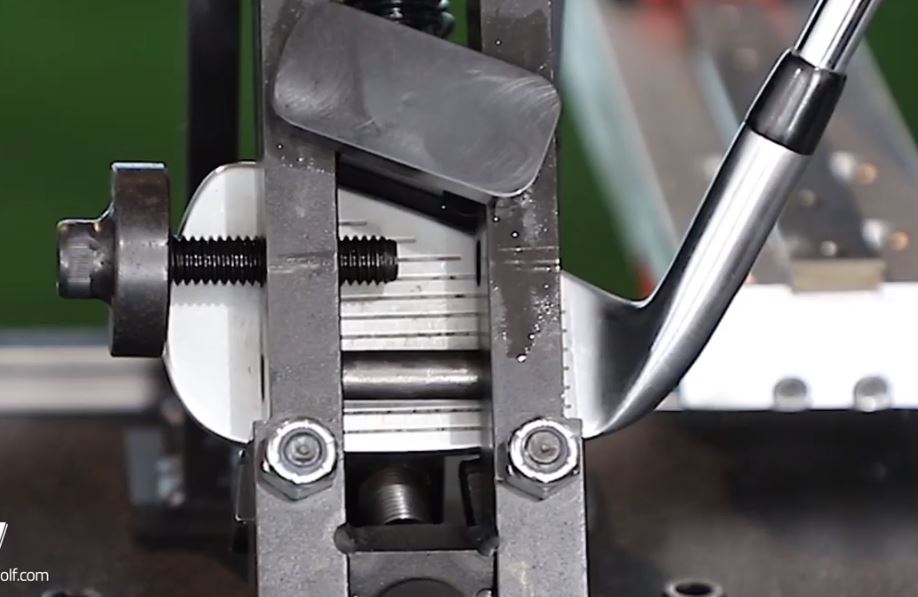
The clubhead sole sits on the two Irons Sole Clamps. They will rotate when the Top Clamp is engaged, which will capture the club to prevent slipping.
The Toe Stop needs to be adjusted so that the club’s face can slide in or out of the Face Fixture to find the horizontal position.
2. Measure loft and lie angles
Measuring its loft and lie angles is important now that the club is secure in the correct register.
To do this, engage the shaft plate against the shaft. Then, position the lie plate under the shaft so you can read both the loft and the lie angle. Be sure to record the appropriate numbers for later reference.
3. Adjust your angles with the bending bar
After determining the golfer’s ideal angles from a lie-fitting method, it’s time to make adjustments. To change the loft and golf lie angle, position the adjustable bending bar as low as possible on the iron’s hosel. To bend, use the bending bar to apply pressure against the hosel to remove torque and then bend by making short bumping motions with the bar. You will feel the hosel bend. With enough practice, you will learn how much each bend feels in actual degrees.
4. Re-Measure your loft and lie
After you’ve bent your clubs, check your new angles to determine if you’ve achieved the ideal angles set for your loft and lie. If you aren’t at the angles you need, repeat the bending process, and re-measure. Once you’ve acquired the desired angles, remove the bending bar and remove the club from the Angle Machine. Record your final measurements.
5. Review Ball Flight
Now its time to analyze how your newly adjusted angles affect ball flight. The golfer should hit balls to witness any change or new patterns. If the resulting ball flight is ideal, then the job is done. If your ideal angles aren’t producing the desired ball flight, start the process over and make adjustments until desired ball flights achieved. In today’s high tech world, flight monitors are used to evaluate ball flight.
This method is used by tour professionals to optimize their performance. And if it works for them, it will work for you. Ask your local PGA professional to assist you in the process and go out and enjoy the game of golf.