
One thing we talk about profusely in class is “red flags.” This usually refers to specs that are laughingly outside their ranges that don’t catch you like a deer in headlights but result more like an audible laugh straight from the diaphragm.
It could be as easy as a driver cut down to 40″ or a swing weight scale in the F or G range. I once had a student from Rhode Island swinging his driver with a stock HZRDUS Blue 6.5 at 318 CPM! (We didn’t know he could handle rebar either).
For me, one red flag that instantly sounds the siren in my head like a tsunami warning for the nearest coastlines is the repeated clicking and ignition of propane tanks — during our graphite-pulling exercise! Expecting the soothing hum of a heat gun, nothing stops me dead in my tracks than hearing that clicking sound as I make a beeline to the nearest culprit.
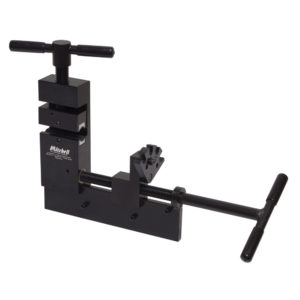
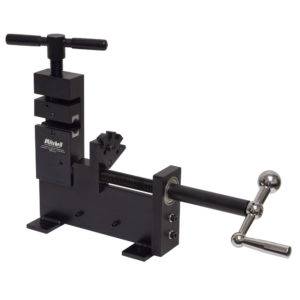
Industrial-strength graphite pullers.
Before we get into the nitty-gritty of pulling graphite, I at least want to explain our two industrial-strength golf shaft extender pullers.
First and foremost, the Pro Plus, our base model, is vice-mounted only. Despite its smaller design for low-volume shops, its size commands portability when needed, plus the strength of steel to go the distance.
As the name implies, the Commercial EZ is designed for higher build quotas and adds a little heft plus sleeker performance like the Balanced Speed Handle. As always, it’s made in the USA in the heart of the Mitten State.
Steel shafts get the torch. Graphite shafts get the heat gun.
Now, the common execution when pulling heads is that steel shafts get the torch, and graphite shafts get the heat gun. The elevated temperature of the torch can melt the resin that binds the fibres of graphite together, thus making the heat gun — at almost a thousand degrees less — the safer play. Let me get this out of the way right now: you CAN use torches on graphite. And by “you,” I am talking about someone who has the subtle touch after hundreds of pulls under their belt.
Once you have your puller mounted on a vice or bench-mounted:
- Be sure your Hosel Stop is to the left for maximum pushing room.
- Select one of the four widths on that Stop to accommodate the shaft you’re pulling.
- Melt that ferrule and pinch it off with pliers or slice it away with a hook or straight blades.
- After 30 to 60 seconds of the gun on the hosel, spin the T-handle to engage the club head, and it should pop off in a straight line.
When it’s not pulled off in that straight line, we have a special place in the Performance Studio for these accidents. Lining the window sill at the front of the building is the Hall of Shame. From snapped hosels while bending to frayed graphite from twisting off heads, the number of autograph-and-dated memorabilia of past students continues to climb.
So don’t be a first ballot Shamer— use our pullers and get your heads and adapters off cleanly!